Introduction:
Installing a fence is one of the most impactful improvements you can make to your property. It boosts your privacy, adds a stylish touch, and increases the overall value of your home. If you’re considering a fence that looks great, lasts for years, and requires minimal maintenance, a composite fence might just be the perfect choice. In this blog, we’ll walk you through how to install a composite fence, whether you’re a first-timer or someone looking to refresh your outdoor space.
Why Choose Composite Fencing?
Composite fences combine the best of both worlds—durability and beauty. Here’s why they’re quickly becoming one of the most popular fence choices:
1. Built to Last
Unlike traditional wood fences, composite fences are resistant to rotting, warping, and damage from insects. Whether you face extreme heat or heavy rainfall, composite materials are designed to endure, which means fewer repairs and replacements down the line.
2. Eco-Friendly
Composite fencing is made from recycled materials, so you’re making an eco-conscious choice when you opt for this type of fence. By using a mix of wood fibers and plastic, composite fences help reduce waste, which is an added bonus for the planet.
3. Low Maintenance
Forget about sanding, painting, and sealing your fence every year. Composite fences only need a gentle wash with water and soap to keep them looking good as new. This makes them perfect for anyone who doesn’t want the hassle of constant upkeep.
4. Stylish Look
Composite fences come in a range of colors and styles. They can mimic the natural look of wood without the worry of fading, splintering, or warping, offering you a beautiful fence that’s as sturdy as it is stylish.
Step-by-Step Guide to Installing a Composite Fence(Video)
Here’s your complete guide to installing your very own composite fence, broken down into simple, easy-to-follow steps:
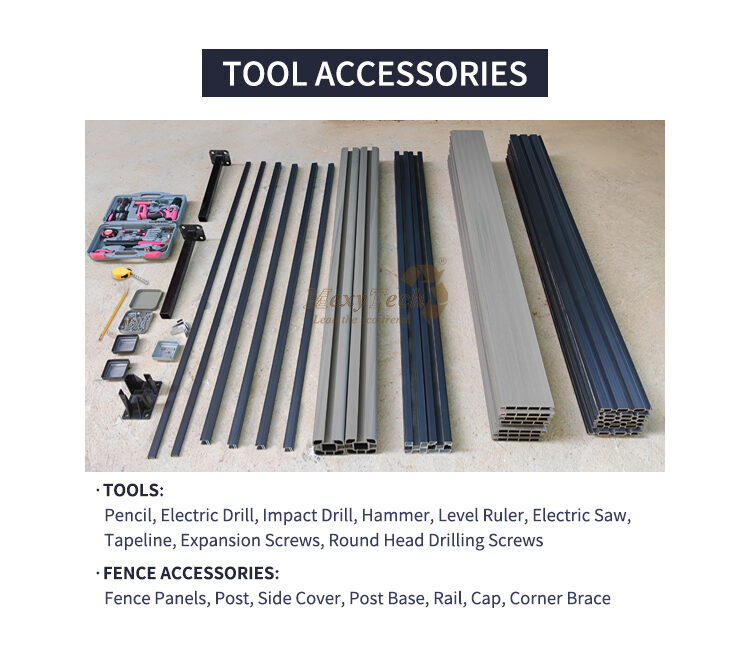
Step 0: Gather Your Materials and Tools
Before you begin, make sure you have all the materials you need. This includes the composite panels, posts, rails, screws, and caps. Having everything on hand will make the process smoother. Don’t forget to get your tools: a drill, tape measure, hammer, saw, and level.
| Tool: | Complete Fence Accessories: |
| Pencil, Electric Drill, Impact Drill, Hammer, Level Ruler, Electric Saw, Tapeline, Expansion Screws, Round Head Drilling Screws. | Composite Fencing panels, Fence Post, Side Cover, Post Base, Rail, Cap, Corner Brace. |
Step 1: Install the Fence Base
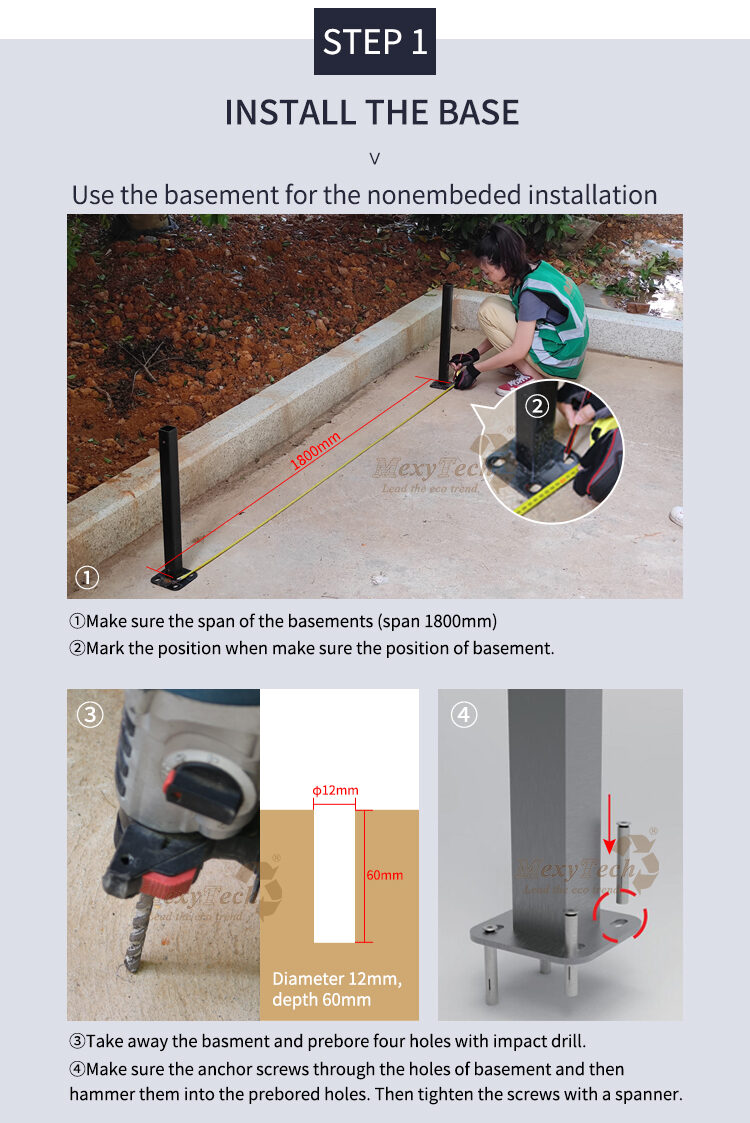
Begin by installing the base for a non-embedded installation.
Measure the Span
Use a tape measure to ensure the span between the basements is 1800mm. Accurate measurements here will ensure your posts are spaced correctly.Mark the Position
Mark the position where each base will be installed. This helps you stay aligned and ensures consistency during installation.Drill Holes
Use an impact drill to pre-drill holes. The hole size should be 12mm in diameter and 60mm deep. This step is essential for anchoring the posts securely.Anchor the Base
After drilling, secure the base with expansion screws. Tighten the screws with a spanner to ensure the base is solidly fixed in place.
Step 2: Install the Posts
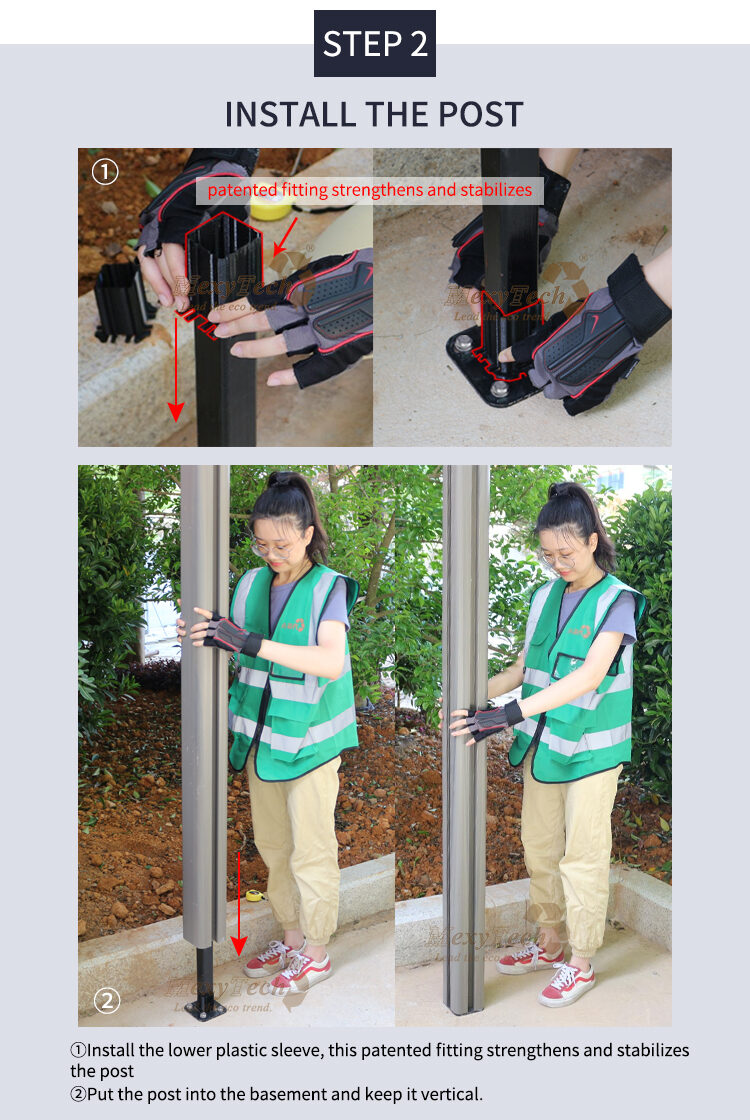
Now that the base is in place, it’s time to install the posts.
Prepare the Post
Attach the lower plastic sleeve to each post. This patented fitting stabilizes the post and helps maintain the vertical alignment during installation.Place the Post
Insert the post into the basement, making sure it is perfectly vertical. This is crucial for ensuring the strength and stability of the entire fence structure.Secure the Post
Use screws to secure the post in place. Check again for vertical alignment to prevent any leaning or misalignment.
Step 3: Install the Bottom Rail
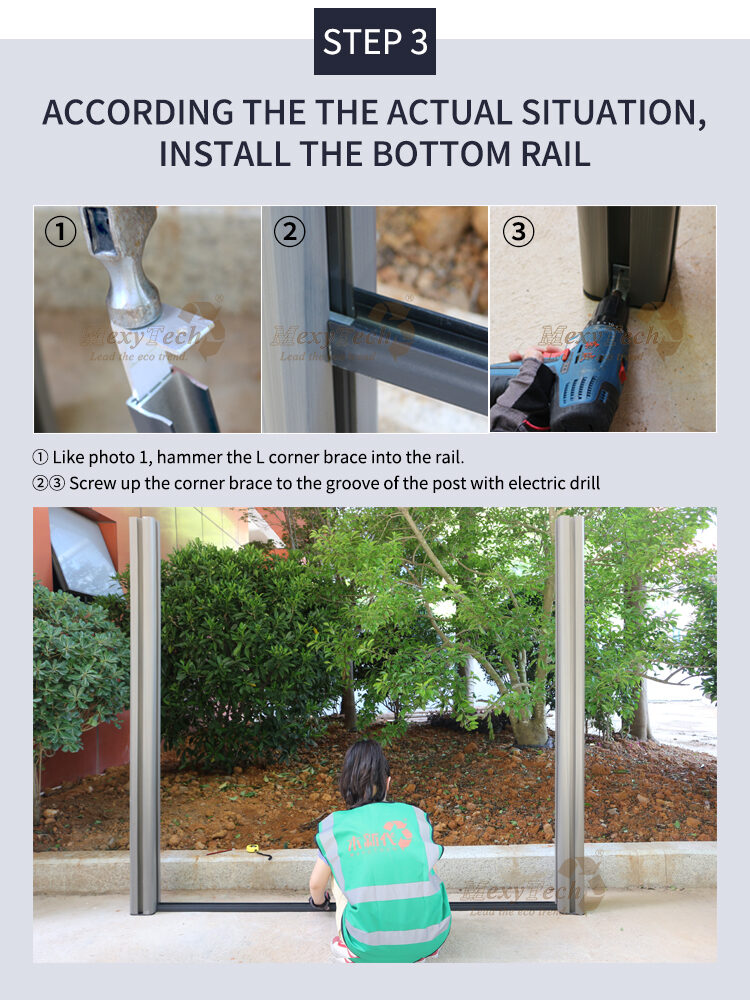
With the posts in place, you can now move on to installing the bottom rail.
Install the Corner Brace
Insert the L-shaped corner brace into the bottom rail, using a hammer to ensure it fits snugly.Secure the Corner Brace
Once in place, use an electric drill to screw the corner brace into the groove of the post. This step ensures the bottom rail is securely connected to the post and remains aligned.
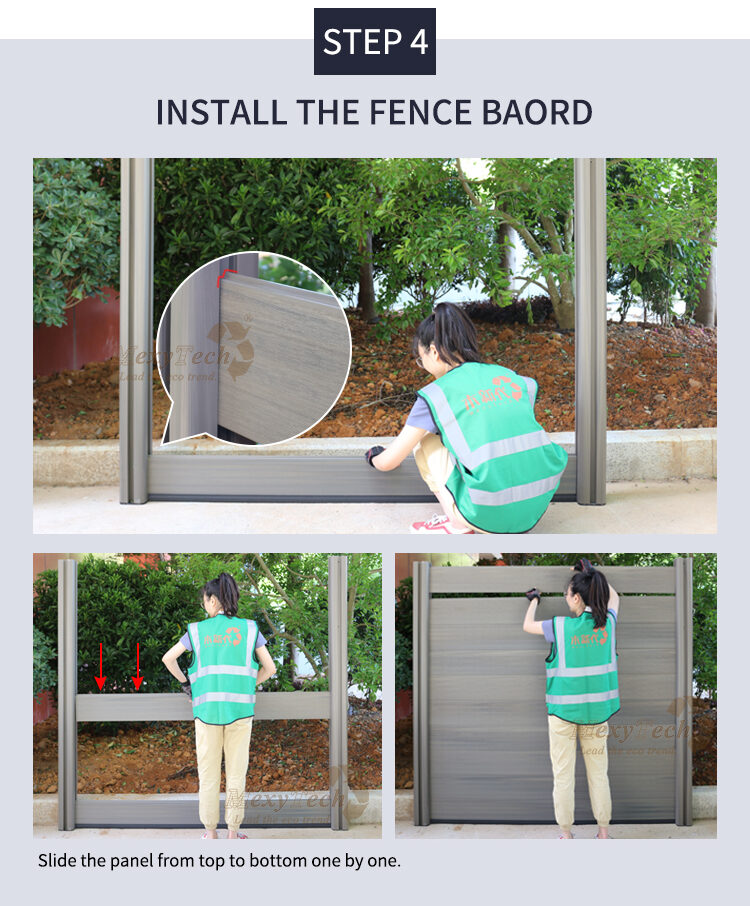
Step 4: Install the Fence Panels
Once the rails are secure, you can begin installing the fence panels.
Slide Panels into Place
Start from the bottom and slide each panel one by one into the rails. This method keeps the fence aligned and ensures a smooth and stable fit.Adjust the Panels
Make sure each panel is aligned properly before securing it. This step will ensure your fence looks clean and neat without any gaps.
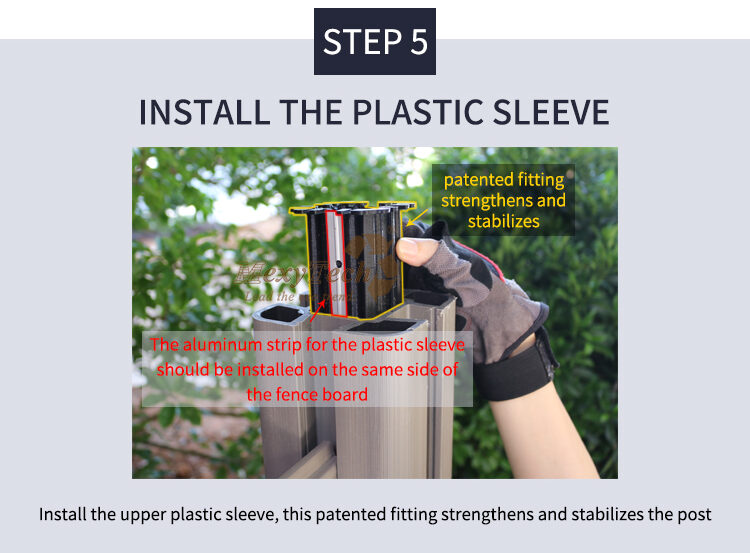
Step 5: Install the Upper Plastic Sleeve
Now, add extra stability with the upper plastic sleeve.
Install the Aluminum Strip
Attach the aluminum strip for the plastic sleeve, ensuring it is installed on the same side as the fence board. This helps stabilize the post and adds durability to the entire structure.
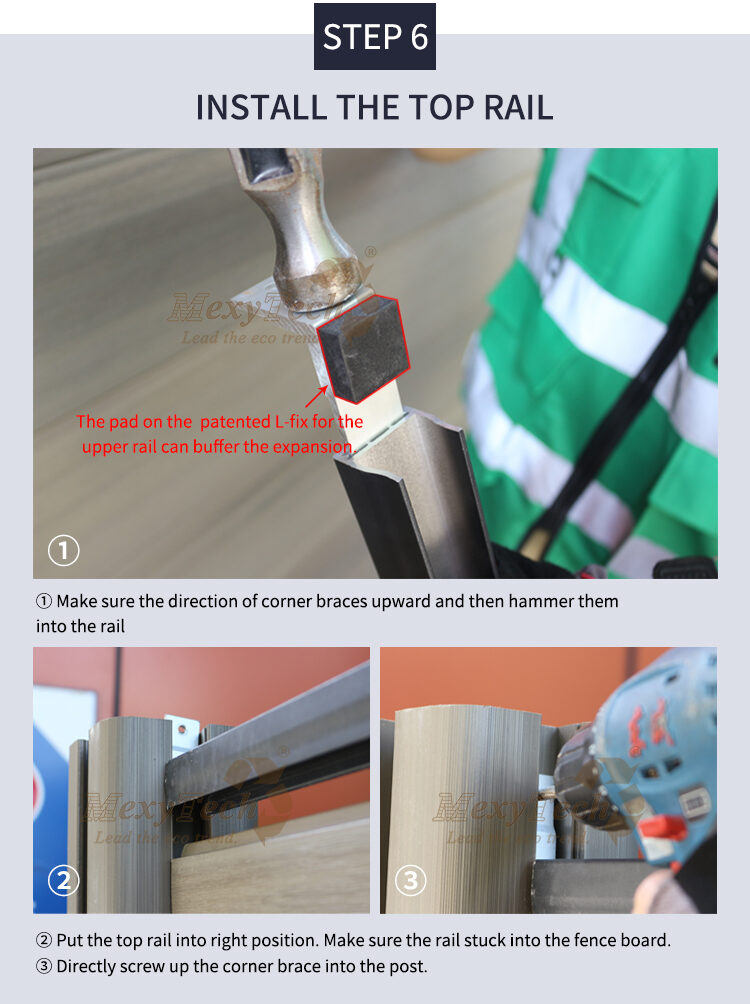
Step 6: Install the Top Rail
With the panels and sleeves in place, you’re ready to install the top rail.
Position the Rail
Carefully position the top rail and ensure it fits properly into the posts.Hammer the Corners
Use the patented L-fix pad to hammer the corner braces into the rail. This step helps buffer expansion and ensures the rail is secure.Screw the Rail
Tighten the top rail by screwing it into the posts, ensuring it is firmly in place.
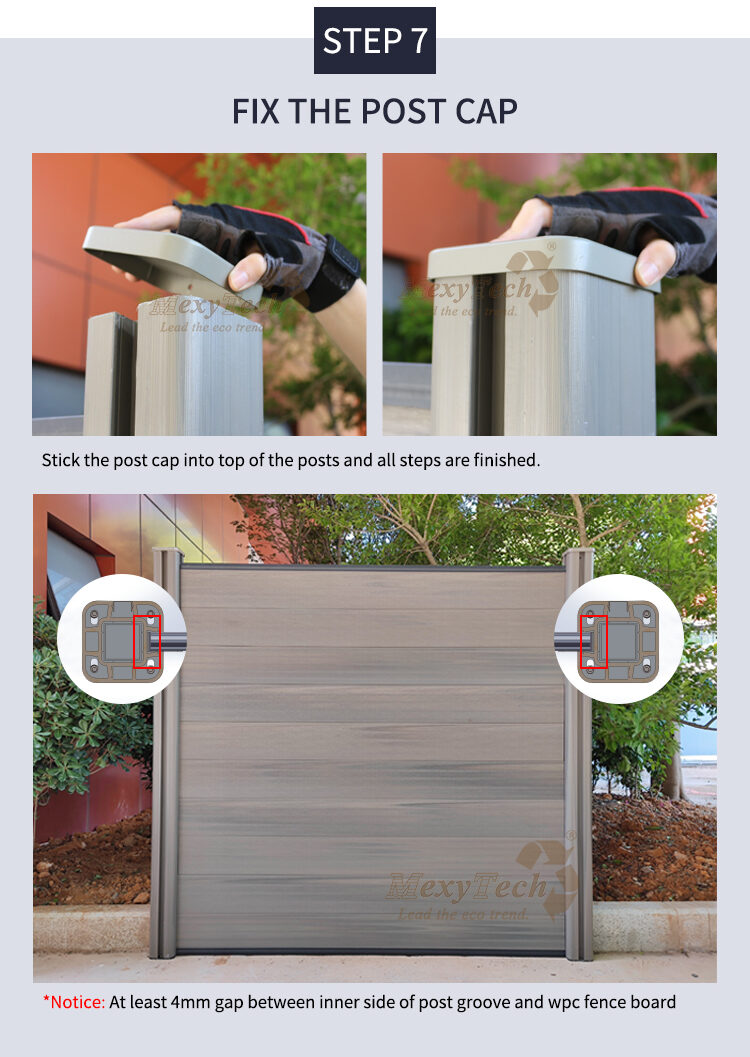
Step 7: Attach the Post Cap
Finish off your fence installation by attaching the post cap.
Secure the Cap
Place the post cap securely on top of each post. This step helps protect the posts from the elements and gives your fence a clean, finished look.
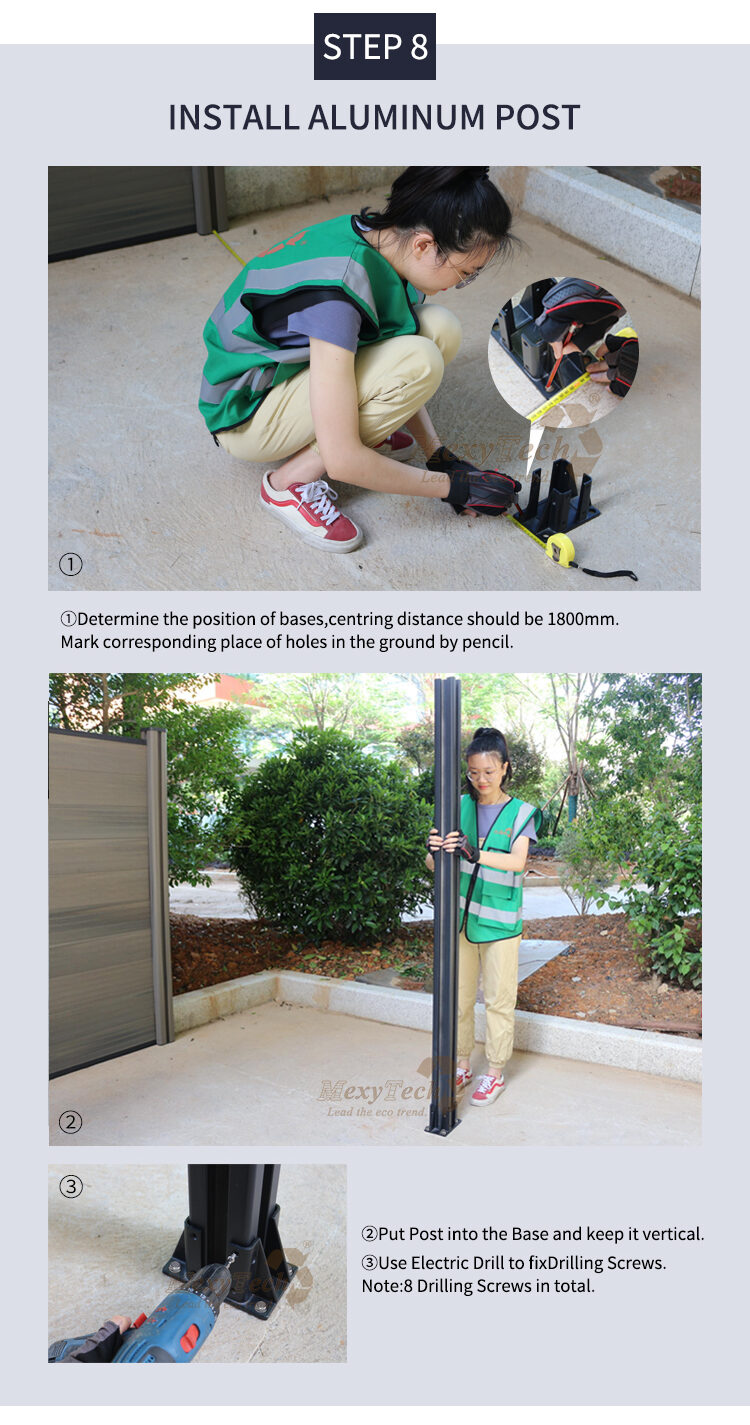
Step 8: Install Aluminum Posts
Finally, install the aluminum posts to complete the structure.
Position the Bases
Ensure the bases are positioned 1800mm apart, marking the hole placements carefully.Place the Posts into the Base
Insert the aluminum posts into the bases, ensuring they remain vertical.Fix the Posts
Use an electric drill to secure the posts with screws. Make sure each post is stable and aligned properly.
Key Factors That Influence Fence Installation Costs
1. Fence Material: What Are You Building With?
The type of fence material you choose is the most significant factor in your overall cost. Here’s a breakdown of the most common fence materials and their cost ranges per linear foot:
Wood Fences: A classic and economical choice, but the price can vary. Expect to pay around $10 – $25 per linear foot for basic wood fences, with the price increasing if you opt for high-quality wood like cedar or if it’s a custom design.
Metal Fences (Wrought Iron or Steel): These are durable and secure, but they’re typically more expensive, ranging from $20 – $50 per linear foot depending on the type and style.
Vinyl Fences: For a low-maintenance, long-lasting option, vinyl fences can cost $25 – $40 per linear foot. It’s a bit pricier upfront but saves you money over the long haul since it requires little maintenance.
Composite Fences: For the highest quality, composite fences are made from recycled materials and cost anywhere from $30 – $60 per linear foot. They look fantastic, don’t fade, and require almost no upkeep.
Chain Link Fences: A budget-friendly option, chain link fences cost between $10 – $20 per linear foot, but they offer the least privacy, so they’re best for containment rather than privacy.
2. Fence Length: How Much Fence Do You Need?
The longer your fence line, the higher the cost. A small yard or a single fence line will cost less than a large estate or commercial project. Here’s a rough idea of the price you might pay based on fence length:
300 Feet of Fence (8-foot tall composite): You could be looking at anywhere from $15,000 – $30,000 depending on material and other factors.
150 Feet of Fence (6-foot tall vinyl): For a more standard yard, expect to pay $8,000 – $15,000.
50 Feet of Fence (chain link or wood): A small project might range from $2,500 – $6,000.
3. Fence Height: How Tall Is Your Fence?
The height of your fence matters too. A 6-foot fence will generally cost less than an 8-foot fence. In fact, you can expect to pay about 1.5 times more for an 8-foot fence than you would for a 6-foot fence of the same material. Here’s a quick comparison:
6-foot fence (wood): Around $6,000.
8-foot fence (wood): Around $9,000.
The taller the fence, the more material and labor are required, making the price jump higher.
4. Jobsite Conditions: What’s the Ground Like?
Jobsite conditions can have a major impact on your project cost. If you’re dealing with uneven ground, slopes, or trees in the way, it can significantly increase both labor and materials costs. Here’s what to expect:
Slope or uneven ground: If the land is sloped, it requires extra work to level the ground or set the posts. This could add an additional $2,000 – $10,000 to the cost.
Tree removal: If there are trees in the way of your fence line, you might need to pay for tree removal, which can cost anywhere from $500 to $5,000 depending on the tree’s size.
Retaining walls: If your fence needs a retaining wall to hold up soil, expect this to add $5,000 – $15,000 to your total.
5. Vehicle Access Gates: Need a Gate?
If you’re planning to add a vehicle gate to your fence, this will add an additional cost. Here’s a quick price range:
Small manual gate: $3,000 – $4,000.
Large, automated gate: $10,000 – $15,000 or more.
Gates, especially automated ones, can add significant costs to your project, so be sure to factor them in if you’re planning on vehicle access.
Real-Life Examples of Fence Costs
Let’s bring it all together with a few real-life examples. Here’s how much you could expect to pay for different fence sizes and materials:
Example 1: 300 Feet of Fence (8 Feet Tall Composite)
Low end (simple job with flat land): $15,000
High end (difficult job with slopes or trees): $30,000
Example 2: 150 Feet of Fence (6 Feet Tall Vinyl)
Low end: $8,000
High end: $15,000
Example 3: 50 Feet of Fence (Chain Link)
Low end: $2,500
High end: $6,000
Breaking Down the Costs by Fence Height
Here’s a quick guide to show how costs change based on fence height. These are approximate figures:
| Fence Type | 6 Feet Tall (Low End) | 6 Feet Tall (High End) | 8 Feet Tall (Low End) | 8 Feet Tall (High End) |
|---|---|---|---|---|
| Wooden Fence | $6,000 | $8,000 | $9,000 | $12,000 |
| Vinyl Fence | $7,000 | $9,000 | $10,500 | $14,000 |
| Composite Fence | $12,000 | $18,000 | $18,000 | $25,000 |
| Chain Link | $3,000 | $5,000 | $4,500 | $7,000 |
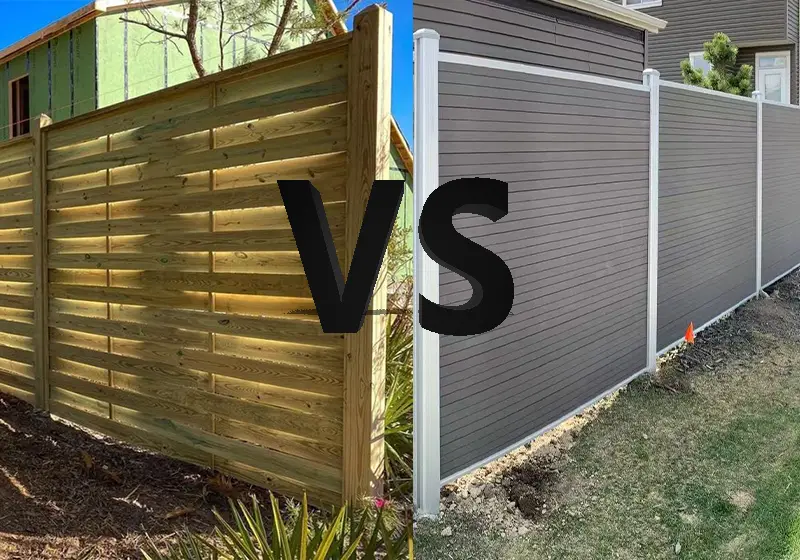
Composite Fencing vs. Traditional Wood Fencing: Which Is Better?
While wood fences have their charm, they come with their own set of challenges. Here’s a comparison between the two options:
Maintenance: Wood requires annual sealing and painting to prevent rot, whereas composite requires minimal upkeep.
Longevity: Composite fences can last 15-20 years, while wood fences may need replacement or major repairs every 10-15 years.
Aesthetics: Composite fences come in a range of colors and styles, offering a more consistent and sleek look compared to natural wood, which can warp, crack, and fade.
Conclusion:
Choosing a composite fence is an excellent way to boost your property’s curb appeal, privacy, and long-term value. While the initial investment might be higher compared to other materials, the low maintenance, durability, and aesthetic appeal make it a smart choice for any homeowner.
With the right knowledge and careful planning, you can successfully install your own composite fence and enjoy its benefits for years to come. If you’re looking for detailed, easy-to-follow guidance, MecoFence is here to help. Offering comprehensive guidebooks and expert tips, MecoFence provides everything you need to ensure a smooth, efficient fence installation.


